When My External Hard Drive Corrupted… So I Did Some Digital Forensics
The Problem
Recently one of my external hard drives decided to betray me.
The drive had a huge collection of books on it that my wife had been storing. When I plugged it into my PC… everything was gone. Along with 300GBs of retro games from SNES all the way to PS2.
No folders. No filenames. Just empty space where the data used to be.
Instead of panicking and randomly copying files around (which can actually make recovery worse), I decided to treat the situation like a small digital forensics investigation.
Preserve the Original Evidence
The first rule of digital forensics:
Never work directly on the original evidence.
Drilling through a drive, mounting it, or copying files incorrectly can overwrite sectors that still contain recoverable data.
So before doing anything else, I created a forensic copy of the damaged disk and performed all recovery work on that copy instead.
This allows me to:
- Preserve the original drive exactly as it is
- Safely experiment with recovery tools
- Restart the recovery process if something goes wrong
- Prevent accidental data destruction
This is the same methodology used in professional digital forensics investigations.
Creating a Forensic Disk Image
The first step was creating a full disk image of the damaged drive.
For this I used ddrescue, which is designed for copying failing or damaged drives safely.
Unlike normal copy tools, ddrescue:
- Skips unreadable sectors
- Logs progress
- Allows recovery attempts to resume later
Example command:
1
sudo ddrescue -f -n /dev/sde external_drive.img external_drive.log
This created a raw disk image that I could safely analyze without touching the original drive.
A Common Misconception about Deleted Files
Most people think when something is deleted from a computer or drive… that it’s gone forever.
In reality, that’s almost never the case.
When a file is deleted, the operating system usually doesn’t erase the actual data immediately. Instead, it simply removes the reference to that file from the filesystem and marks that space as available for reuse.
The data itself often remains on the disk until something else eventually overwrites it.
This is exactly why digital forensics tools are able to recover files long after they appear to be gone.
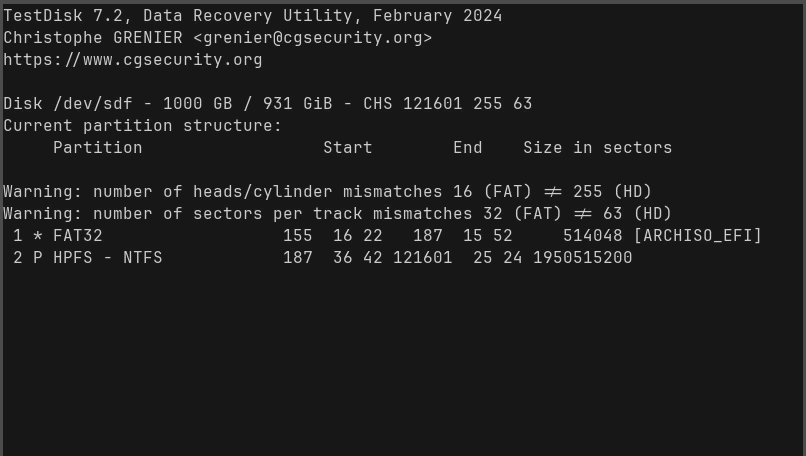
Investigating the Filesystem with TestDisk
Once the disk image was created, I used TestDisk to examine the partition table and filesystem structure.
TestDisk is extremely useful for:
- Recovering lost partitions
- Rebuilding damaged partition tables
- Identifying filesystem corruption
Command used:
1
sudo testdisk external_drive.img
Unfortunately in this case the filesystem structure appeared to be severely damaged, so direct filesystem recovery wasn’t possible.
That meant it was time to move on to file carving.
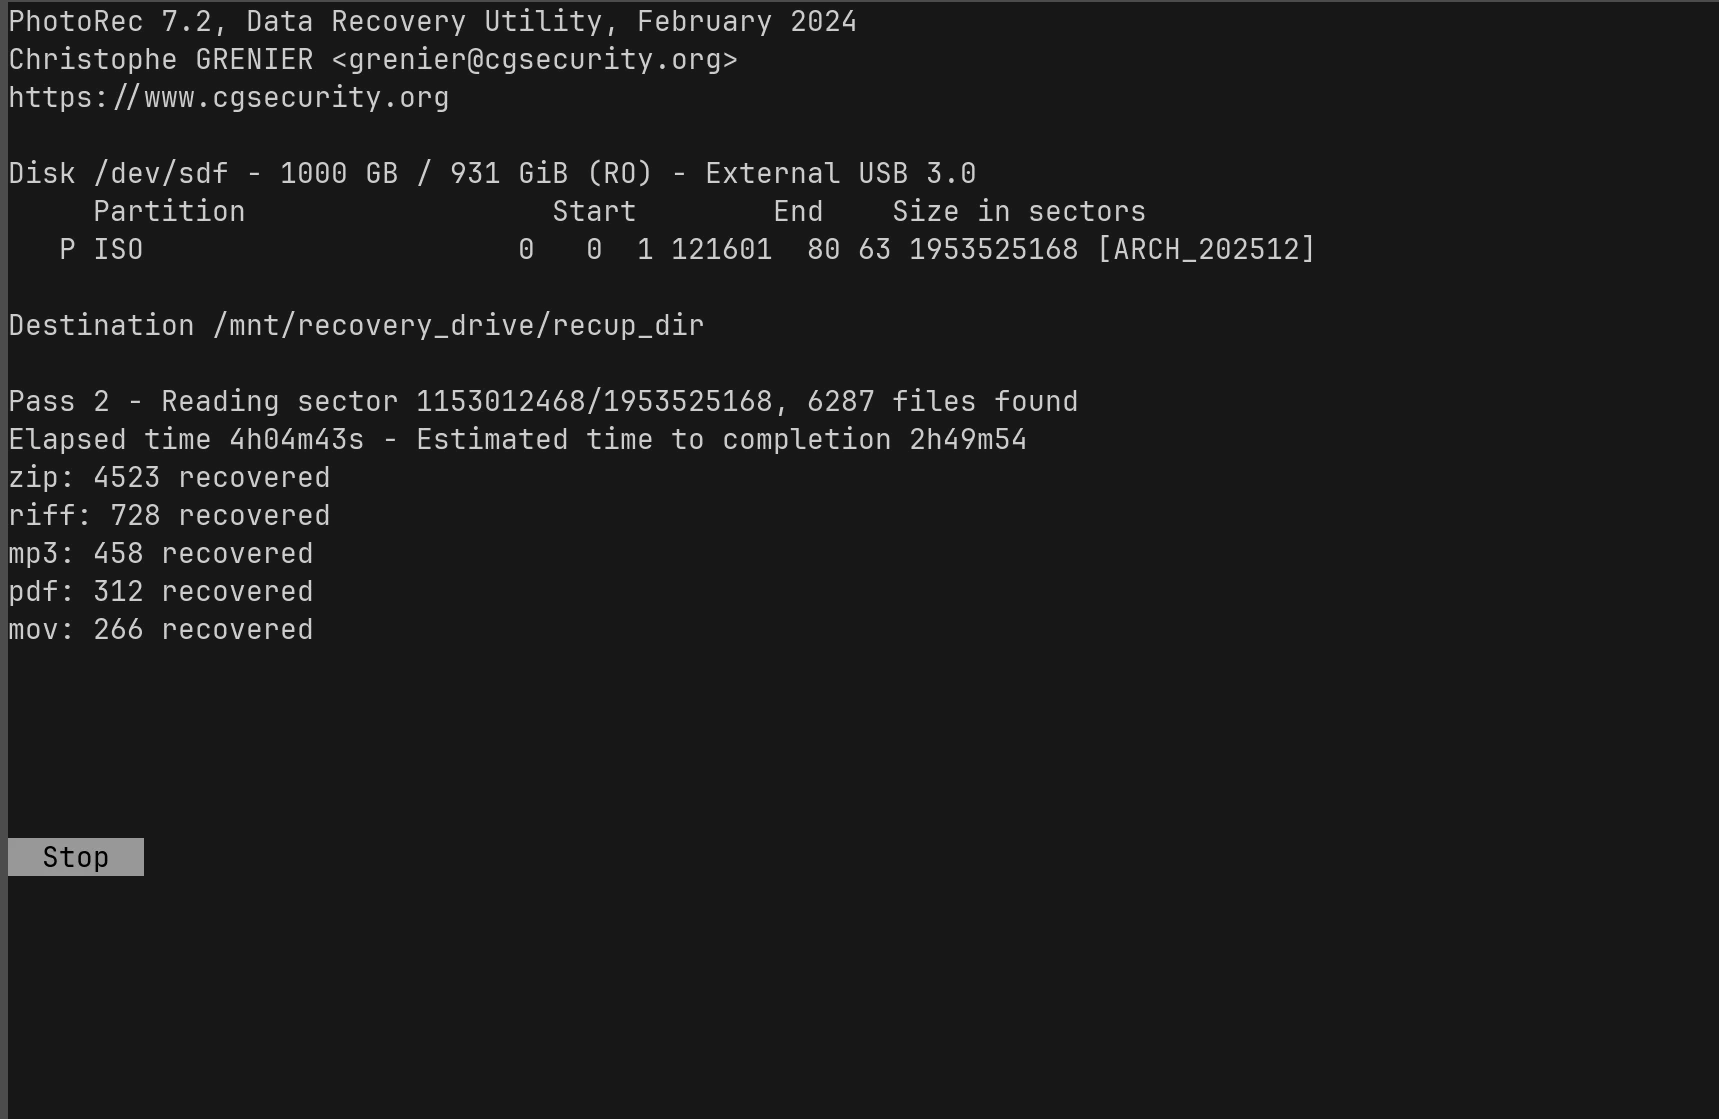
File Carving with PhotoRec
Since the filesystem metadata was damaged, I used PhotoRec to scan the disk image sector-by-sector looking for recoverable files.
PhotoRec works by identifying file signatures instead of relying on the filesystem.
That means it can recover files even when:
- Filenames are lost
- Folder structures are gone
- The filesystem is completely corrupted
Command used:
1
sudo photorec external_drive.img
PhotoRec then began scanning the disk and recovering files based purely on raw data signatures.
Recovery Progress
The scan began discovering files almost immediately.
So far the recovery process has identified thousands of recoverable files including:
- ZIP archives
- PDFs
- Images
- Media files
Example recovery output:
- ZIP files recovered
- MP3 files recovered
- PDF documents recovered
Why File Names Are Missing
One thing that surprises people during recovery is that filenames and folders are usually lost.
That’s because filenames are stored in filesystem metadata.
When that metadata becomes corrupted, tools like PhotoRec can still recover the raw files — but they cannot reconstruct the original directory structure.
So recovered files typically appear as:
1
2
3
recup_dir.1/
recup_dir.2/
recup_dir.3/
With filenames like:
1
2
f12345678.pdf
f22345671.zip
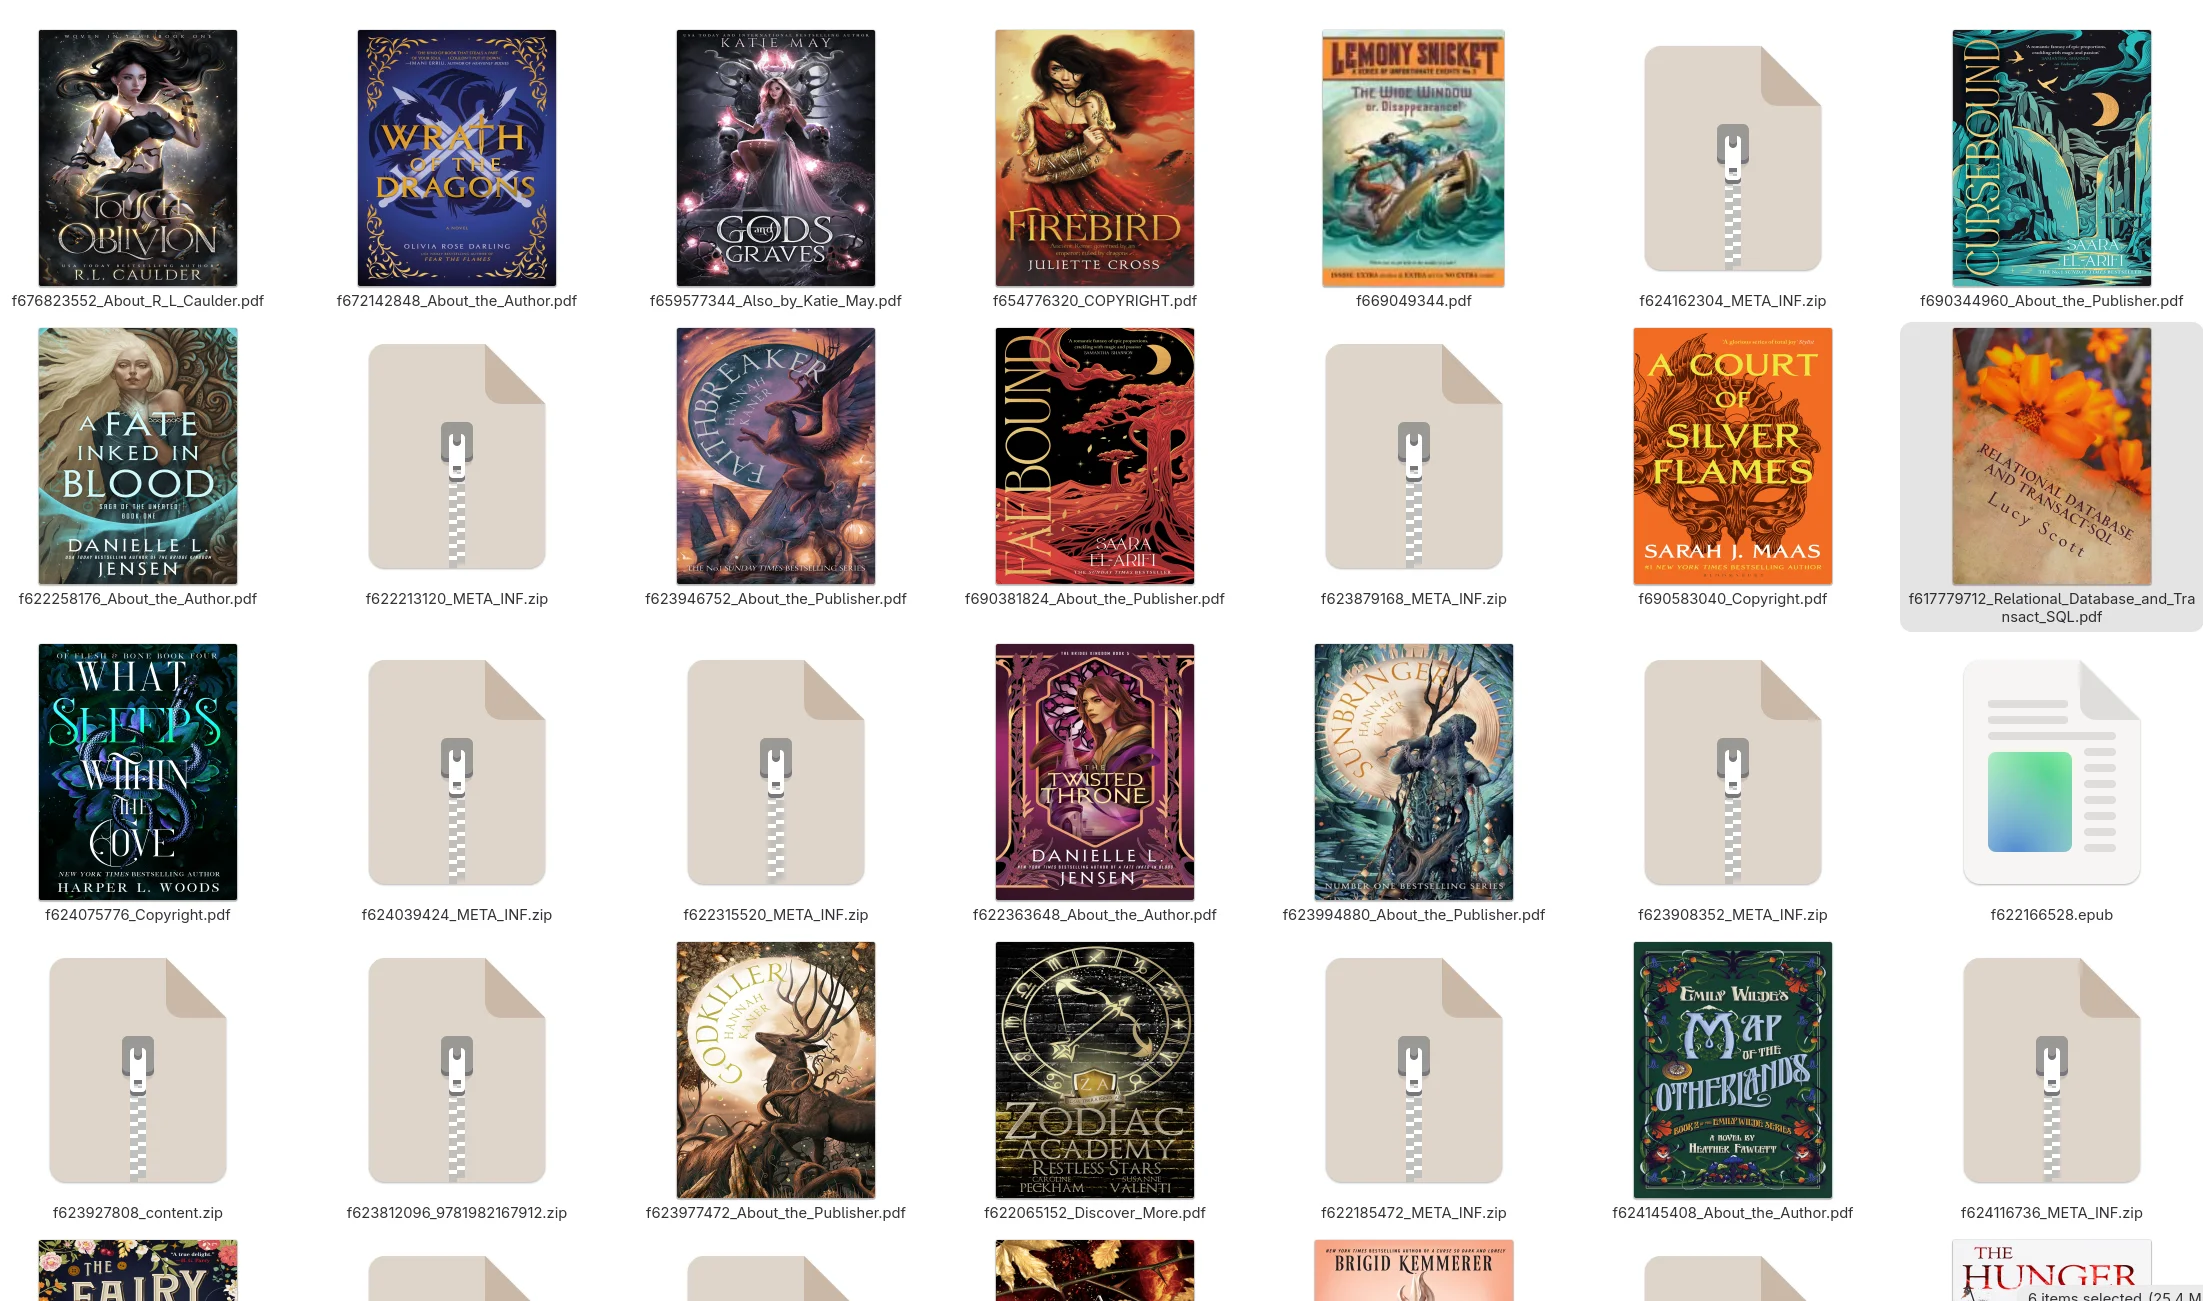
Sorting and rebuilding the collection becomes part of the recovery process.
Lessons Learned
Even before the recovery finishes, this experience reinforced several important lessons:
- Always maintain backups of important data
- Never perform recovery directly on the original disk
- Creating a disk image first protects the original evidence
- File carving tools can recover data even when filesystems are destroyed