Case Study: USB File Invemtory, Hash Comparison, and Hex-Level Data Recovery
Case Overview
In this lab scenario, I was provided with a USB drive containing files relevant to a legal matter. Since returning to a lab environment was not possible, the objective was to generate a quick but thorough report directly from a Windows system.
The tasks included:
- Performing a full file inventory using command line tools
- Identifying hidden files
- Comparing similar files to detect differences
- Reviewing hex editor functionality from a forensic perspective
- Recovering an embedded JPEG file using hexadecimal signatures
All work was performed on Windows 11.
USB File Inventory Using Command Line
During this setup, the listing shows files inside of a thumb drive. All files were located and listed as visible files with timestamps, there were no hidden or invisible files found.
To generate the report, I used the dir command with multiple switches:
/sto include subdirectories/t:wto display last modified timestamps/a:hto display hidden files/bto display files by path
This allowed me to generate:
- Visible files list
- Hidden files list
- Visible files listed by full path
- Hidden files listed by full path
While reviewing the directory output, I identified duplicate documents located in different directories:
- THE FREEDOM OF INFORMATION ACT.docx
- RevHistory.xlsx
Both appeared in the root directory and inside a subfolder named Data, with different timestamps. This suggests that the files were copied or moved instead of being hidden.
File Comparison Using COMP and FC
An attorney provided two files that appeared identical. The objective was to determine whether any data differences existed.
I used the Windows comp command:
1
comp /m Summary1.csv Summary2.csv
**The output revealed the numeric differences between the two files. To further identify the exact differencesm I used:
1
fc Summary1.csv Summary2.csv
Two of the differences that were identified were:
“1,041” → “9,041”
“-163,768” → “-163,769”
This shows how even small numerical changed can be detected using Windows tools.
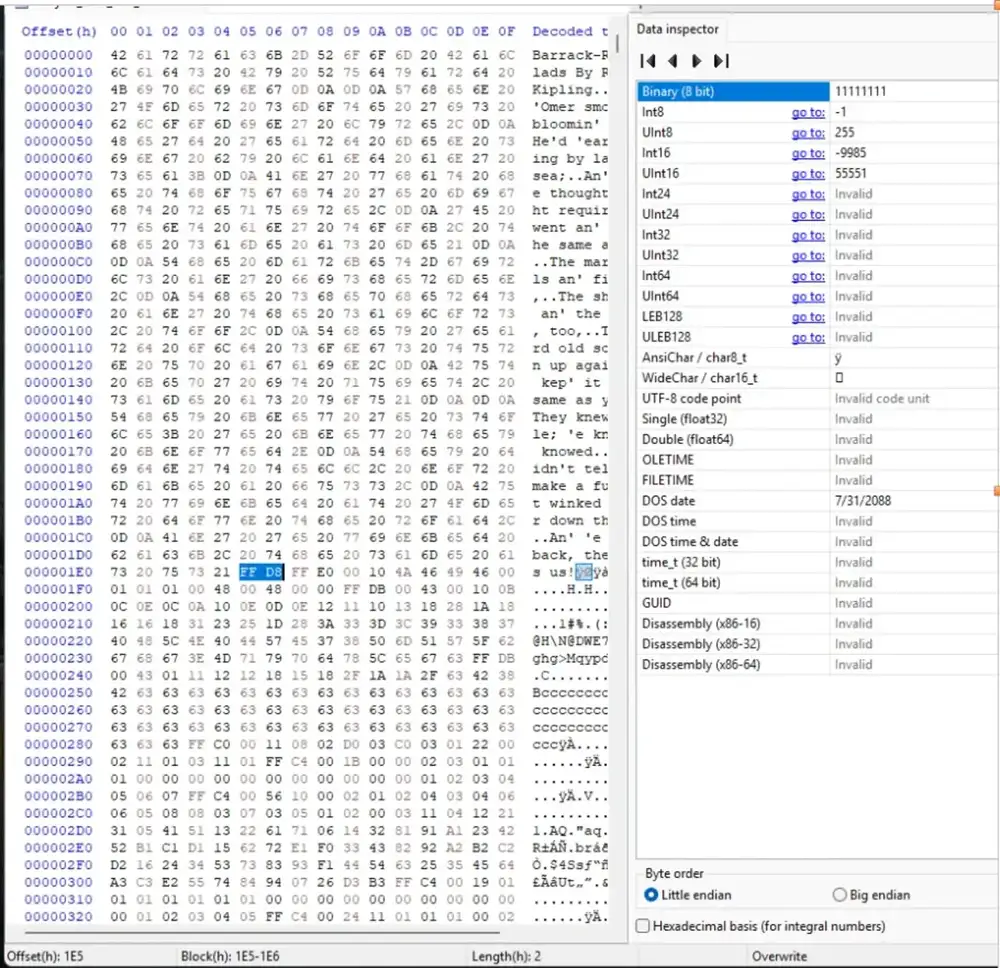
Extracting an Embedded JPEG with HxD
What I did:
- Opened HxD.
- Went to File > Open and selected the data file I was given (
Hex_Extract.dat). - Used Search > Find and switched to the Hex-values tab.
Searched for the JPEG header by typing:
FFD8
Once it hit, HxD showed the start offset at:
Offset(h): 1E5
Then I searched again for the JPEG end marker:
FFD9
HxD displayed the ending offset as
E947, but because the marker is two bytes, the real end offset for the block is:E948
Selecting the Correct Byte Range
I used Edit > Select block and entered:
- Start offset:
1E5 - End offset:
E948
- Start offset:
- Then I copied the selected block (Edit > Copy).
- Created a new blank file (File > New).
- Pasted the selection using Edit > Paste insert (confirmed the prompt).
Saving and Testing the Recovery
- Saved the new file using File > Save as and gave it a
.jpgextension. - Opened the saved
.jpgin the default photo viewer to verify it worked.
The recovered image opened successfully (boat at a dock), which confirmed the extraction worked and the offsets were correct.
Conclusion
This was my first type of Forensic Analysis I have done and it taught me a lot.
This exercise reinforced how powerful low level analysis can be in a forensic investigation. Even when a file is not visible through normal file system browsing, its raw data can still exist within a container file.
By identifying the JPEG header (FF D8) and footer (FF D9), calculating accurate offsets, and extracting the byte range manually, I was able to recover the embedded image successfully.
This kind of manual file carving helps build a deeper understanding of how forensic tools automate recovery behind the scenes. Instead of relying entirely on software, working directly with offsets and hex values strengthens foundational DFIR skills.
If it’s not broken, fix it til it is.